Util Classes
- Packet filtering
- CommandSenderUtils
- CommunicationUtils
- Simple ItemStack creation
- DataUtils
- PlayerUtils
Packet filtering
BaseIONetworkManager contains two fields: sendFilters and receiveFilters. You can filter packets just by adding your own filter to these filter sets. A filter is defined as BiPredicate<Packet, NetworkManager>. If the BiPredicate returns true the packet will be filtered and consequently no further processed. For performance purposes you should always check for the correct packet type first.
The NetworkManager instance is provided on purpose:
You can get Player connection information with
((InetSocketAddress)net.channel().remoteAddress()).getAddress().getHostAddress() (here: player's IP).
You can get the player object with
((NetHandlerPlayServer)net.getNetHandler()).playerEntity.
Keep in mind that depending on your packet you have other INetHandlers than NetHandlerPlayServer.
Example:
BaseIONetworkManager.receiveFilters.add((packet, networkManager) -> {
   if (packet instanceof CPacketLoginStart) {
      CPacketLoginStart packet = (CPacketLoginStart) p;
      GameProfile player = packet.getProfile();
      Logger.info("GameProfile " + player.toString() + " tries to connect");
   }
   return true;
});
CommandSenderUtils
CommandSenderUtils provides methods for differentiating different ICommandSenders. You can differentiate between
- The console:
isConsole(sender) - Players
isPlayer(sender) - FakePlayers
isFakePlayer(sender) - Operators
isCommandSenderOp(sender)
CommunicationUtils
CommunicationUtils groups functions for communicating with users.
Click events
This feature allows localized strings
Since 1.8 Minecraft provides the possibility to click on custom elements in chat. The method clickEvent(sender, msg, options...) gives this feature to the mod.
As this feature is being reworked, just a quick look-over:
Currently this command creates a simple choice list. Example:
clickEvent(sender, "Stop server?", new Pair<>(" [Yes]", ()-> System.exit(0)), new Pair<>(" [No]", ()-> MessageUtils.messageToSender(sender, "Okay.")))

Player chat:
Stop server? [Yes] [No]
Inventory Menus
InventoryMenu provides a system to create menus based on the ability to click on chest slots.
To create your own menu BaseIO provides a fast construction method:public InventoryMenu(String title, boolean doBackButton, Pair<ItemStack, TriConsumer<EntityPlayerMP, InventoryMenu, Object[]>>... items (same also available with items as an iterator)
title describes the name of the container (Example: "[Shop] Buy Menu")
doBackButton defines wether the first slot in the inventory should be a back button (to a menu before)
items is a list (or varargs) of Pairs. The index in the list defines the position of the item. The first element of the Pair is the item that should be displayed at the slot, the second is a method (TriConsumer, here implemented with a lambda) that will be called when the player clicks on the slot. The custom ItemStack creation helps creating the ItemStack.
An example constructor would be (Java 8):
InventoryMenu myMenu = new InventoryMenu("My Menu", false,
    Pair.create(new DisplayStackGen(Items.APPLE).name("give apple!").gen(), (player, menu, args)-> player.inventory.addItemStackToInventory(new ItemStack(Items.APPLE))),
    null,
    Pair.create(new DisplayStackGen(Blocks.STONE).name("STONE").ench().gen(), null)
)
As you can see the menu creation is pretty simple.
This example would create a menu with an apple in the first slot and a stone in the third slot. If you click on the apple the server will give you an apple. The stone has no interaction.
Value input
When the user is in an InventoryMenu it is not possible to make an input via chat. You should use AnvilEdit instead.
AnvilEdit opens an anvil GUI
Simple ItemStack creation
DisplayStackGen is a simple util class that is able to generate your own ItemStack in one line.
To create a new ItemStack with this class just create a new DisplayStackGen object, configure it and at the end call .gen(), witch creates the ItemStack. Examples:
new DisplayStackGen().gen();  // RuntimeException, you forgot to define an item.
new DisplayStackGen().item(Items.APPLE).gen();  // An apple.
new DisplayStackGen().block(Blocks.STONE).gen();  // A stone.
new DisplayStackGen(Blocks.STONE).gen();  // Same as above, works for both blocks and items.
new DisplayStackGen(Items.APPLE).ench().count(2).name("APPLE").tooltip("not android").gen(); // Two shiny apples with fitting name and tooltip.
Methods
| item(Item) | set the displayed item |
| block(Block) | set the displayed item corresponding to the block |
| ench() | set the item glowing (enchanted) |
| name(String) | set the name of the item. Color codes accepted |
| tooltip(String...) | set the item tooltip. Multiple strings are allowed for multiple lines for the tooltip |
| count(int) | set the item count displayed |
| damage(int) | set the item damage (metadata) |
DataUtils
DataUtils is a class designed to load and save all data from or to a file (e.g. PlayerIO is based on it) and is frankly just a wrapper for Google's gson project, adding some Minecraft-related type adapters.
Simple setup
Loading
Saving
In the most simple way you save your object by just calling DataUtils.saveData(Object obj, Type objType, String filename).
ObjType has to be the type of the object to save. If your object has no generics you can simply use your objects class, otherwise I recommend using new TypeToken<your object>(){}.getType(). The filename is a string that will be handed over to a java.io.File constructor. If the filename has no extension .json will be used as default.
Example:
List<String> list = new ArrayList<>();
Type listType = new TypeToken<List<String>>(){}.getType();

// DataUtils.saveData(list, List.class, "testfile"); // WRONG - only use for objects without generics

DataUtils.saveData(list, listType, "testfile"); // CORRECT - will be saved to ./testfile.json
Adding your own TypeAdapters
If you want to save a class that can't be serialized (e.g. abstract classes) like a normal object (just fields) you have to write a TypeAdapter for it. You should inform yourself how to do that, here's a simple TypeAdapter:
public class UUIDTypeAdapter extends TypeAdapter<UUID> {
   @Override
   public void write(JsonWriter out, UUID value) throws IOException {
      out.value(value.toString() + " (" + Utils.orDefault(PlayerUtils.getName(value), "unknown") + ')');
   }

   @Override
   public UUID read(JsonReader in) throws IOException {
      return UUID.fromString(in.nextString().replaceFirst(" \\(.+\\)", "").replaceFirst("(\\w{8})(\\w{4})(\\w{4})(\\w{4})(\\w{12})", "$1-$2-$3-$4-$5"));
   }
}
To use this TypeAdapter in conjunction with DataUtils you can use DataUtils.with(Collections.singletonMap(UUID.class, new UUIDTypeAdapter()). This returns you a DataUtils instance with additionally registered UUIDTypeAdapter. DataUtils.with acctepts a Map with the Type as key and either TypeAdapter or TypeAdapterFactory (Also all other type adapters gson is supporting).
For easy mapping of multiple type adapters you can use Utils.map(key, value, key, value, ...)
PlayerUtils
Player Teleportation
In version 1.10 BaseIO contains multiple teleport implementations. If you encounter issues regarding teleportations, try switching the implementation in BaseIO's config file
PlayerUtils.teleportPlayerUnsafe(EntityPlayerMP player, Position position) teleports a player to the specified position forcibly. If you want to be sure the player doesn't teleport into blocks, use PlayerUtils.teleportPlayer(EntityPlayerMP player, Position position, boolean noisy). When the destination is an unsafe block this method won't teleport the player, returning false and (with noisy = true) printing a message to the player specifying the problem. For convenience teleportPlayer is overloaded with a ICommandSender instead of EntityPlayerMP (other senders than EntityPlayerMP will be discarded).
Identifier conversion
You might want to search a player by it's name quite often. For such cases (and many more "conversions") PlayerUtils provides a full set of conversion methods:
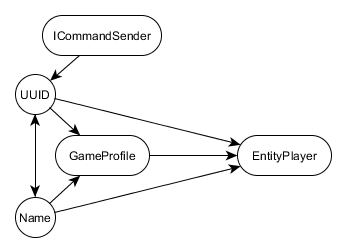
| ↓ From | To → | UUID | Name | GameProfile | EntityPlayer | ICommandSender |
| UUID | PlayerUtils:getName | PlayerUtils:getGameProfile | PlayerUtils:getPlayer | PlayerUtils:getPlayer | |
| Name | PlayerUtils:getUUID | PlayerUtils:getGameProfile | PlayerUtils:getPlayer | PlayerUtils:getPlayer | |
| GameProfile | GameProfile:getId | GameProfile:getName | PlayerUtils:getPlayer | PlayerUtils:getPlayer | |
| EntityPlayer | EntityPlayer:getUniqueId | ICommandSender:getName | EntityPlayer:getProfile | typecast | |
| ICommandSender | PlayerUtils:getUUID | ICommandSender:getName | (only via typecast) | typecast |
If no player is found null will be returned.
In 1.7, ICommandSender:getName was named ICommandSender:getCommandSenderName
PlayerUtils is capable to convert any ICommandSender to an UUID, including console and command blocks. This UUID might not be a valid UUID of Minecraft but it can be used to identify it and additionally PlayerUtils:getName supports these UUIDs. Every Command Sender of one class has the same UUID.
Ranges
All conversion methods have a range parameter that determines how broad the search should be.
| Range | Inclusion | Full search area |
| ONLINE | Includes online players | online players |
| FAKE | Includes fake players | online (fake)players |
| SERVER | Includes offline players | online/offline (fake)players |
| ALL | Includes players that have never been on the server | all minecraft players |