BaseIO
A library mod for many UWM mods
- Util Classes
- Packet filtering
- CommandSenderUtils
- CommunicationUtils
- Simple ItemStack creation
- DataUtils
- PlayerUtils
- Main Features
- Background Features
Util Classes
Packet filtering
BaseIONetworkManager contains two fields: sendFilters and receiveFilters. You can filter packets just by adding your own filter to these filter sets. A filter is defined as BiPredicate<Packet, NetworkManager>. If the BiPredicate returns true the packet will be filtered and consequently no further processed. For performance purposes you should always check for the correct packet type first.
The NetworkManager instance is provided on purpose:
You can get Player connection information with
((InetSocketAddress)net.channel().remoteAddress()).getAddress().getHostAddress() (here: player's IP).
You can get the player object with
((NetHandlerPlayServer)net.getNetHandler()).playerEntity.
Keep in mind that depending on your packet you have other INetHandlers than NetHandlerPlayServer.
Example:
BaseIONetworkManager.receiveFilters.add((packet, networkManager) -> {
   if (packet instanceof CPacketLoginStart) {
      CPacketLoginStart packet = (CPacketLoginStart) p;
      GameProfile player = packet.getProfile();
      Logger.info("GameProfile " + player.toString() + " tries to connect");
   }
   return true;
});
CommandSenderUtils
CommandSenderUtils provides methods for differentiating different ICommandSenders. You can differentiate between
- The console:
isConsole(sender) - Players
isPlayer(sender) - FakePlayers
isFakePlayer(sender) - Operators
isCommandSenderOp(sender)
CommunicationUtils
CommunicationUtils groups functions for communicating with users.
Click events
This feature allows localized strings
Since 1.8 Minecraft provides the possibility to click on custom elements in chat. The method clickEvent(sender, msg, options...) gives this feature to the mod.
As this feature is being reworked, just a quick look-over:
Currently this command creates a simple choice list. Example:
clickEvent(sender, "Stop server?", new Pair<>(" [Yes]", ()-> System.exit(0)), new Pair<>(" [No]", ()-> MessageUtils.messageToSender(sender, "Okay.")))

Player chat:
Stop server? [Yes] [No]
Inventory Menus
InventoryMenu provides a system to create menus based on the ability to click on chest slots.
To create your own menu BaseIO provides a fast construction method:public InventoryMenu(String title, boolean doBackButton, Pair<ItemStack, TriConsumer<EntityPlayerMP, InventoryMenu, Object[]>>... items (same also available with items as an iterator)
title describes the name of the container (Example: "[Shop] Buy Menu")
doBackButton defines wether the first slot in the inventory should be a back button (to a menu before)
items is a list (or varargs) of Pairs. The index in the list defines the position of the item. The first element of the Pair is the item that should be displayed at the slot, the second is a method (TriConsumer, here implemented with a lambda) that will be called when the player clicks on the slot. The custom ItemStack creation helps creating the ItemStack.
An example constructor would be (Java 8):
InventoryMenu myMenu = new InventoryMenu("My Menu", false,
    Pair.create(new DisplayStackGen(Items.APPLE).name("give apple!").gen(), (player, menu, args)-> player.inventory.addItemStackToInventory(new ItemStack(Items.APPLE))),
    null,
    Pair.create(new DisplayStackGen(Blocks.STONE).name("STONE").ench().gen(), null)
)
As you can see the menu creation is pretty simple.
This example would create a menu with an apple in the first slot and a stone in the third slot. If you click on the apple the server will give you an apple. The stone has no interaction.
Value input
When the user is in an InventoryMenu it is not possible to make an input via chat. You should use AnvilEdit instead.
AnvilEdit opens an anvil GUI
Simple ItemStack creation
DisplayStackGen is a simple util class that is able to generate your own ItemStack in one line.
To create a new ItemStack with this class just create a new DisplayStackGen object, configure it and at the end call .gen(), witch creates the ItemStack. Examples:
new DisplayStackGen().gen();  // RuntimeException, you forgot to define an item.
new DisplayStackGen().item(Items.APPLE).gen();  // An apple.
new DisplayStackGen().block(Blocks.STONE).gen();  // A stone.
new DisplayStackGen(Blocks.STONE).gen();  // Same as above, works for both blocks and items.
new DisplayStackGen(Items.APPLE).ench().count(2).name("APPLE").tooltip("not android").gen(); // Two shiny apples with fitting name and tooltip.
Methods
| item(Item) | set the displayed item |
| block(Block) | set the displayed item corresponding to the block |
| ench() | set the item glowing (enchanted) |
| name(String) | set the name of the item. Color codes accepted |
| tooltip(String...) | set the item tooltip. Multiple strings are allowed for multiple lines for the tooltip |
| count(int) | set the item count displayed |
| damage(int) | set the item damage (metadata) |
DataUtils
DataUtils is a class designed to load and save all data from or to a file (e.g. PlayerIO is based on it) and is frankly just a wrapper for Google's gson project, adding some Minecraft-related type adapters.
Simple setup
Loading
Saving
In the most simple way you save your object by just calling DataUtils.saveData(Object obj, Type objType, String filename).
ObjType has to be the type of the object to save. If your object has no generics you can simply use your objects class, otherwise I recommend using new TypeToken<your object>(){}.getType(). The filename is a string that will be handed over to a java.io.File constructor. If the filename has no extension .json will be used as default.
Example:
List<String> list = new ArrayList<>();
Type listType = new TypeToken<List<String>>(){}.getType();

// DataUtils.saveData(list, List.class, "testfile"); // WRONG - only use for objects without generics

DataUtils.saveData(list, listType, "testfile"); // CORRECT - will be saved to ./testfile.json
Adding your own TypeAdapters
If you want to save a class that can't be serialized (e.g. abstract classes) like a normal object (just fields) you have to write a TypeAdapter for it. You should inform yourself how to do that, here's a simple TypeAdapter:
public class UUIDTypeAdapter extends TypeAdapter<UUID> {
   @Override
   public void write(JsonWriter out, UUID value) throws IOException {
      out.value(value.toString() + " (" + Utils.orDefault(PlayerUtils.getName(value), "unknown") + ')');
   }

   @Override
   public UUID read(JsonReader in) throws IOException {
      return UUID.fromString(in.nextString().replaceFirst(" \\(.+\\)", "").replaceFirst("(\\w{8})(\\w{4})(\\w{4})(\\w{4})(\\w{12})", "$1-$2-$3-$4-$5"));
   }
}
To use this TypeAdapter in conjunction with DataUtils you can use DataUtils.with(Collections.singletonMap(UUID.class, new UUIDTypeAdapter()). This returns you a DataUtils instance with additionally registered UUIDTypeAdapter. DataUtils.with acctepts a Map with the Type as key and either TypeAdapter or TypeAdapterFactory (Also all other type adapters gson is supporting).
For easy mapping of multiple type adapters you can use Utils.map(key, value, key, value, ...)
PlayerUtils
Player Teleportation
In version 1.10 BaseIO contains multiple teleport implementations. If you encounter issues regarding teleportations, try switching the implementation in BaseIO's config file
PlayerUtils.teleportPlayerUnsafe(EntityPlayerMP player, Position position) teleports a player to the specified position forcibly. If you want to be sure the player doesn't teleport into blocks, use PlayerUtils.teleportPlayer(EntityPlayerMP player, Position position, boolean noisy). When the destination is an unsafe block this method won't teleport the player, returning false and (with noisy = true) printing a message to the player specifying the problem. For convenience teleportPlayer is overloaded with a ICommandSender instead of EntityPlayerMP (other senders than EntityPlayerMP will be discarded).
Identifier conversion
You might want to search a player by it's name quite often. For such cases (and many more "conversions") PlayerUtils provides a full set of conversion methods:
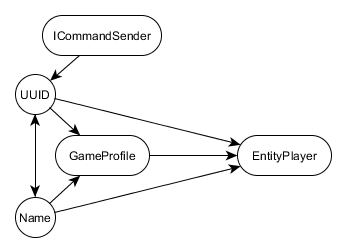
| ↓ From | To → | UUID | Name | GameProfile | EntityPlayer | ICommandSender |
| UUID | PlayerUtils:getName | PlayerUtils:getGameProfile | PlayerUtils:getPlayer | PlayerUtils:getPlayer | |
| Name | PlayerUtils:getUUID | PlayerUtils:getGameProfile | PlayerUtils:getPlayer | PlayerUtils:getPlayer | |
| GameProfile | GameProfile:getId | GameProfile:getName | PlayerUtils:getPlayer | PlayerUtils:getPlayer | |
| EntityPlayer | EntityPlayer:getUniqueId | ICommandSender:getName | EntityPlayer:getProfile | typecast | |
| ICommandSender | PlayerUtils:getUUID | ICommandSender:getName | (only via typecast) | typecast |
If no player is found null will be returned.
In 1.7, ICommandSender:getName was named ICommandSender:getCommandSenderName
PlayerUtils is capable to convert any ICommandSender to an UUID, including console and command blocks. This UUID might not be a valid UUID of Minecraft but it can be used to identify it and additionally PlayerUtils:getName supports these UUIDs. Every Command Sender of one class has the same UUID.
Ranges
All conversion methods have a range parameter that determines how broad the search should be.
| Range | Inclusion | Full search area |
| ONLINE | Includes online players | online players |
| FAKE | Includes fake players | online (fake)players |
| SERVER | Includes offline players | online/offline (fake)players |
| ALL | Includes players that have never been on the server | all minecraft players |
Main Features
Player Storage
BaseIO provides an easy way to store data for the players. To use this feature just create a new class extending com.unitedworldminers.BaseIO.storage.PlayerStorage. This will be your storage class. Every player will have an instance of this class. You have to implement void onNewUser(), this method will be called everytime BaseIO has to create a new user. With getUUID() you can always retrieve the players UUID. onNewUser allows to throw a NewInstanceException when you don't want to create a storage for that user. But be warned, when retrieving userdata you will have to check for null storages.
BaseIO saves your storage based on your modID! Changing the modID will result in data loss!
The data itself on the other hand won't be deleted. You can try to modify the storage for that, but there will be no support for this.
To now save some values you just create your fields in your storage class. Every field in that class will be stored, if you don't want this you can give the transistent attribute to that field.
An example storage might be:
public class MyStorage extends PlayerStorage {
    boolean aBool;
    String aString;
    transient String bString;

    @Override
    protected void onNewUser() throws NewInstanceException {
        aString = "UUID: " + getUUID();
        bString = "This value won't be saved";
    }
}
To get a player's storage instance you just use one of the methods of the PlayerIO class.
-
get(String modID, UUID uuid)is the fastest way to get your storage. ModID is the id you defined in your @Mod annotation. Use this method for cases running multiple times per second (e.g. tick events). -
get(UUID uuid)will retrieve your modID automatically, which is more expensive. Use this method only for user-input purposes (e.g. in commands). -
get(String name)will retrieve the player's UUID by the name and uses the method above next. -
get(ICommandSender sender)is a simplified method for general purpose, but only EntityPlayer is allowed (FakePlayer is a subclass of EntityPlayer).
Additionally you can retrieve all storages of a player by calling ensuredGet(UUID uuid).
Additionally you can retrieve all your storages by calling getAll(Class clazz) with clazz as your storage class.
PlayerIO will save your storage automatically.
To manually save or reload the data, use PlayerIO.save() or PlayerIO.load().
An example working with your storage:
ICommandSender caller;
MyStorage storage = PlayerIO.get(caller);
if (storage.aBool) {
    storage.bString = "Permission granted.";
    PlayerIO.save();
}
Simple Commands
BaseIO simplifies command creation with the class SimpleCommand. Instead of implementing ICommand you extend SimpleCommand.
If you don't like the simplifications made by this feature just override the original method from ICommand.
This is what SimpleCommand can do for you:
-
Simple command names
getCommandName()andgetCommandAliases()are combined incommandNames()where the first command name is the actual command name and the others are aliases. Example: -
public List<String> commandNames() {
    //return Collections.singletonList("name1");
    return Arrays.asList("name1", "name2", "name3");
} -
localized/default command usage
Provide a localization key incommandUsage()and it will be localized as described in Localization. Provide an invalid or no (null) localization key and SimpleCommand creates a default command usage for you based on the arguments. -
redundancy removal
isUsernameIndexandcompareToare removed.
-
Options
You can define command options ingetOptions(). Options are arguments starting with a hyphen that can be used at any position of the arguments. Additionally options might have arguments attached to themselves. When implemented, getOptions() must return a map with the option string as the key and a string array of potential option arguments, the elements describing the option argument at its index. If found, the options will be cut out of the argument array and added to the option set that will be passed to the run method you have to implement in your command.
Example: -
@Override
public void run(MinecraftServer server, ICommandSender sender, String[] args, Map<String, String[]> options) {
    System.out.println("Args: " + String.join(" ", args));
    for (Map.Entry<String, String[]> option: options.entrySet()) {
        System.out.println("Option " + option.getKey() + ": " + (option.getValue == null ? "null" : String.join(" ", option.getValue())));
    }
}

@NotNull
@Override
protected Map<String, String[]> getOptions() {
    //return Utils.mapKeys("opt1", "opt2", "opt3");
    return Utils.map("opt1", new String[]{"oa1", "oa2"}, "opt2", null, "opt3", null);
}
If now a player uses the command
/mycommand arg1 arg2 -opt1 A B arg3 -opt3the output would be:Args: arg1 arg2 arg3
Option opt1: A B
Option opt3: null -
Tab Completion
Tab completions can be defined by the return string intabCompletions(). The syntax allowes highly configurable tab completions:- The completions for each argument are seperated by a space.
- The different completions for an argument are seperated by a pipe ("|").
- Conditions for a completion are written in braces directly before it.
- If you have multiple completions for a condition you can seperate them by a comma instead of a pipe.
Examples: -
"comp1|comp2|comp3" => The completions "comp1","comp2" and "comp3" for the first argument

"compA compB1|compB2 compC" => "compA" for the first, "compB1" and "compB2" for the second and "compC" for the third argument

"compA1|compA2 (compA1)compB1,compB2|compB3" => "compA1" and "compA2" for the first argument, "compB3" for the second argument, "compB1" and "compB2" only if argument 1 is "compA1".
Variables are available for tab completions. They are defined by a leading "%" and are also customizable. Build-in variables are:-
%d: Dimensions (can be resolved to the dimension id by WorldUtils. -
%p: Players -
%null: No completions (explicitly)
customTabCompletions. This method will be called if the tab completion contains an unknown variable and requests a list of completions for this variable. The currently requested variable is found in the parametertagwithout the leading%. Other parameters are the command sender, the currently typed arguments and the completions up to that point (read-only).
Example:@Override
protected String tabCompletions() {
return "compA|%p|%var1";
}
@Override
protected Collection<String> customTabCompletions(String tag, List<String> current, ICommandSender sender, String[] args) {
if (tag.equals("var1")) {
return Collections.singletonList("result1");
}
return null;
} -
Localization
It is highly recommended that you use this feature as it also allows server admins to customize your strings.
Localization is a feature of MessageUtils.
Setup
To start working with BaseIO's localization feature just call MessageUtils.setupTranslations(langResourcePath). For the most basic setup use null as parameter and you're done. Now server admins can add translations for your strings as they wish.
If you want to add your own translations to your mod fill langResourcePath with a string path pointing to a folder in your mod resources.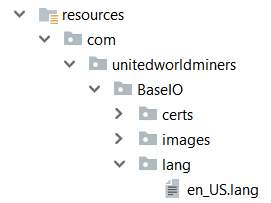
For example BaseIO has MessageUtils.setupTranslations("com/unitedworldminers/BaseIO/lang").
It is recommended to call this method in your init method (FMLInitializationEvent).
Creating localization mappings
The default language file is en_US.lang. This file will be used if you aren't providing the correct language.
You can use almost any string as a key, but it's recommended to abstract them.
The mapping files itself are the same as the ones from Minecraft: <key>=<mapping>, an example file can be found on the right sidebar. This files have to be named by the language tag given by Minecraft and must have the extension .lang.
In the mappings you can use arguments following the same format of the java formatter (String.format). These arguments can be injected in the method calls using localizations.
If you are a modder you put the files in your resource folder that you pointed at in setupTranslations.
If you are a server admin you can put the files into config/lang/<modid>/.
You can reload the mappings with /baseio reloadMessages <modid>.
Using localizations
Your localizations can be used in
MessageUtils.messageToSender()- Simplecommand's
commandUsage() - Manually:
MessageUtils.getTranslation()
Background Features
Help Fixer
BaseIO contains the fixed /help command from matthewprenger.
Mod Page
Source
Ban Entry Fixer
Minecraft contains a bug/flaw/irritating feature that causes a new ban to forget the ban date and replaces it with the ban end date. Problem is that you can't see when the user got banned. BaseIO fixes that.
Duplicate Command
BaseIO adds support for multiple commands with the same name by adding a duplicate command. If you execute a command with multiple meanings a selector will be displayed so you can choose for the command you want. Additionally your choice will be saved so you don't need to do select everytime.
You can disable this feature in the config located in config/BaseIO.cfg